How to Make a Mood Board for Interior Design
This post contains affiliate links, which means we may earn a small commission if you purchase through them — at no additional cost to you. Please see our policy page for more details.
Have you ever wanted to plan a room makeover but had no idea how to visualize it? Learning how to make a mood board for interior design is helpful with decorating, and I’ve used this countless times when designing a new room.
You won’t be able to stop at just one, and you’ll find yourself designing rooms that don’t exist. No? Just me? Ok. Moving on…
What is a Mood Board?
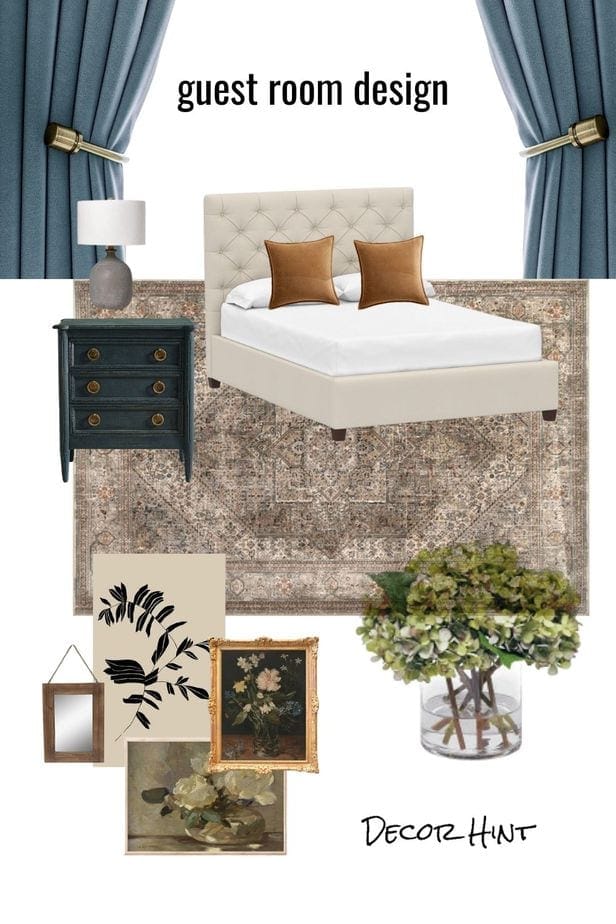
Let’s start with the basics. What is a mood board, anyway? It’s a collection of our ideas in a visual representation.
With interior design, this can be a collection of textures, paint colors, furnishings, rugs, artwork, etc. You can go as detailed as you want or as simple as possible.
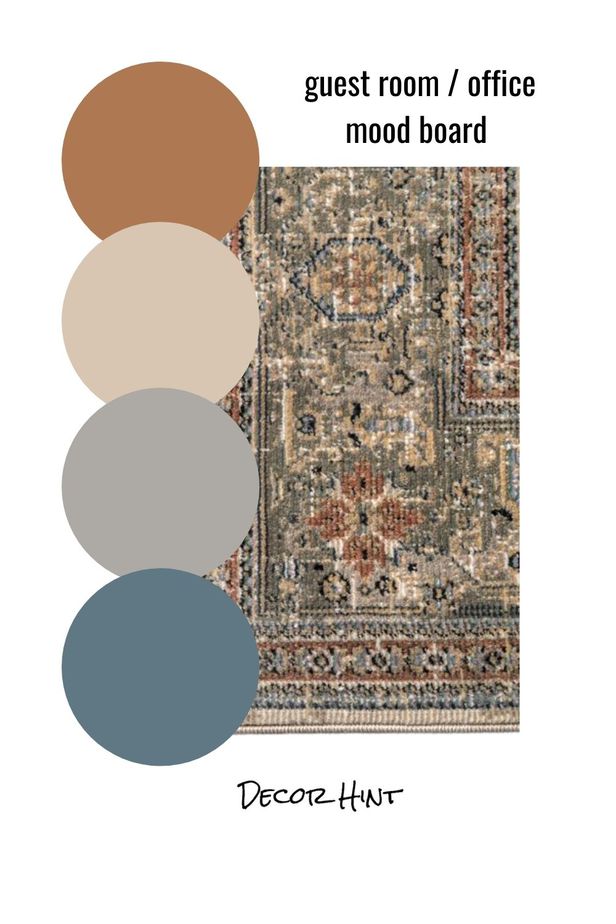

You can also put together a mood board of favorite spaces. This gives you an overall vibe of the design, and it helps to refer back to this throughout the design process. Mood boards can either be digital or physical.
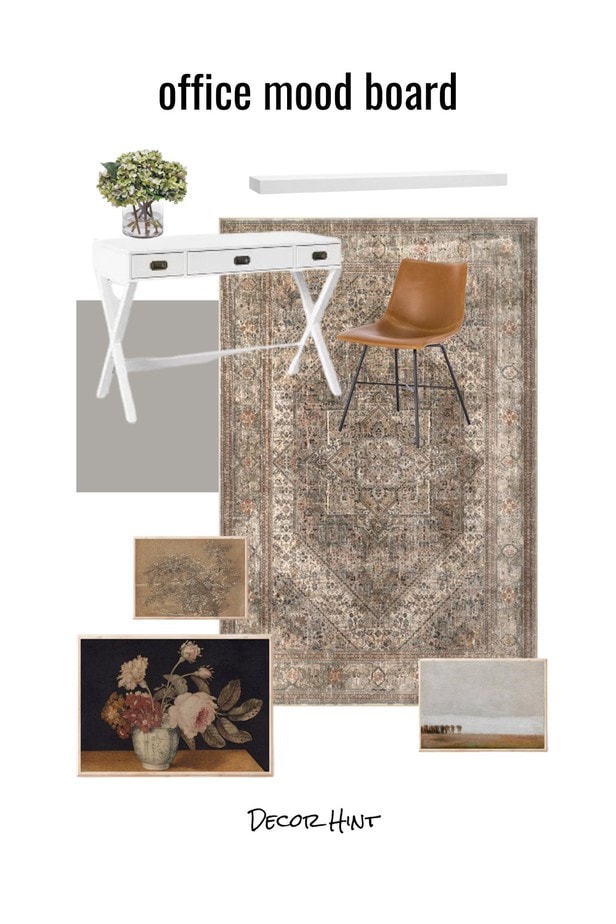
I’m teaching you the digital way to do this in today’s tutorial. However, if you have a bulletin board, scissors, and a bunch of magazines/catalogs/paint swatches – you can go hog wild creating one that way.
Making a mood board has become the starting point for all my room makeovers. It’s just so helpful to see how everything will come together!
Where to Begin?
I like to start a design with one piece of inspiration.
Maybe it’s a space I saw on Instagram that caught my eye. Or, perhaps it’s a favorite rug or piece of art I want to design around. Maybe I fell in love with a specific wallpaper. It can even be an heirloom – a quilt passed down, a vintage piece of furniture, etc.
Whatever it is, I suggest starting with this one thing for your mood board and going from there. Then, you can start pulling in coordinating colors and textures.
I also think it’s helpful to stay true to your home’s design style and vibe. You don’t want to go so far off base that it looks disconnected from the rest of the house.
This might take some soul-searching. For instance, I used to pin a ton of different styles. But as time went on, I realized what I was pinning over and over and over again – vintage mixed with modern. Traditional design with modern touches.
How to Create a Mood Board for Interior Design
I’ll take you through this step by step. It’s a little bit techy but doable. You can do this on a computer or a phone – either work!
Step 1: Start Saving Your Favorites.
Whether on your phone or your computer, you’ll want to start saving images, furniture, etc., to fill up your mood board. Remember that one piece of inspiration? Ensure you have the image form, so you might need to find a similar style online or take a quick snapshot of it.
(For me, it’s this beautiful rug from Rugs USA!)
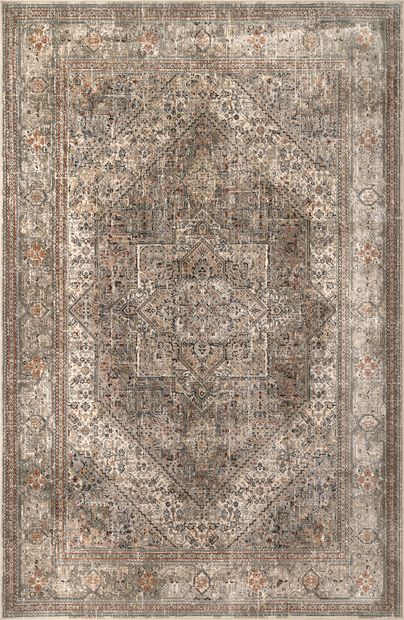
You can save images from Google and other stores by right-clicking with your mouse, then selecting “Save Image As.” If you are on your phone, you can long-press on an image, then choose “Save Image.” You can also take a screenshot!
Not all images can be saved, and sometimes you’ll have to move on and find a different image!
Try to think about all the elements you’ll want and need in your room, such as;
- furniture
- rugs
- window treatments
- bedding
- pillows
- artwork
- greenery
Step 2: Canva
I use Canva to make all my mood boards. It’s easy to use, available as a mobile app (when I want to work on my phone), and has every feature I need. It’s available free, or you can get the Pro version. I use the Pro version because I use it a lot for blogging. You can also use Photoshop, but that has more of a learning curve. Canva is just so easy right out of the gate.
If you are working on your phone, you want to go to the App Store and download Canva. If you are on your computer, you can head to Canva.com.
Making an account is helpful because then you can save all your uploads (and they have many other Pro features I love). I keep all my furniture picks in a folder on Canva for easy access. Then, I can pull from this same folder when designing multiple rooms.
Step 3: Upload Images
You’ll want to upload all the images you saved from Step 1 into Canva. Here’s how to do that.
First, you want to create a design by clicking the “Create a Design” button in the top right-hand corner. I use the Instagram Story or Pinterest Pin templates, but you can use whatever dimensions you want here. Maybe you have a small square room or a long rectangular room that you want to match.

Second, you will see a side panel on the left when the template pops up. Click “Uploads” on the side panel and then click “Upload Media.” You can also drag and drop your files directly into Canva.

Step 4: Design your Mood Board
Now the fun part! Once all your images are uploaded into Canva, please select the image and pull it over to the template to make your collage. It’s straightforward! You can click once on the image or drag it over with your mouse.
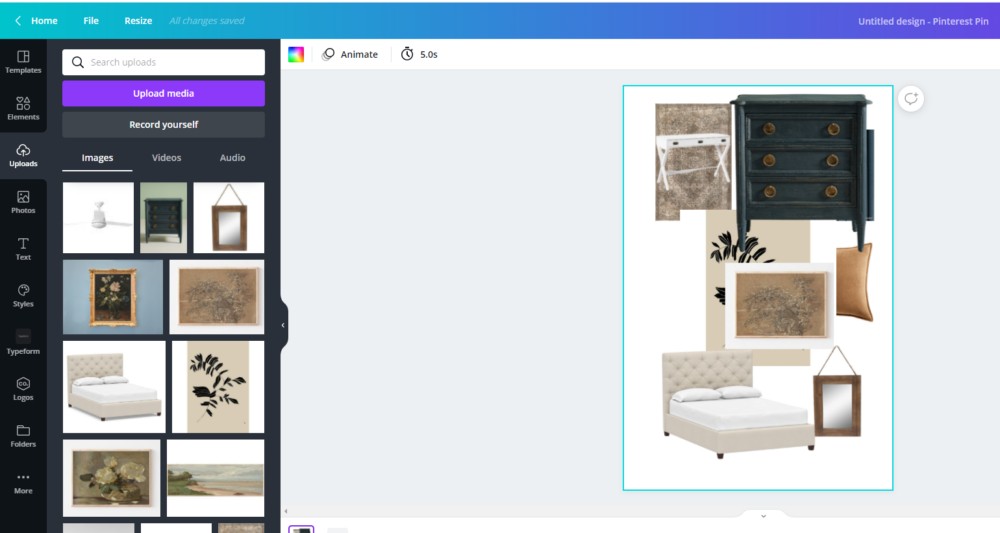
Canva has guidelines to make sure everything is centered and straight. I usually start my mood boards with the rug and then put all the furniture pieces on top to see how it would look.
Resize/crop your images
You can also resize your images by clicking on them and moving the white dots in the corners to your liking. The white lines will crop your image (there is also a “Crop” button in the top bar) – if you want to remove some of the space around it.
It’s so fun to play around with this!
Remove the background from your images
If you are a Canva Pro user, you have access to this neat feature called Background Remover. You take your furniture images and remove the background with the click of a mouse.
To use this feature, sign up for the Pro version and head to “Effects” on the top bar. Background Remover is the first option under the search bar.
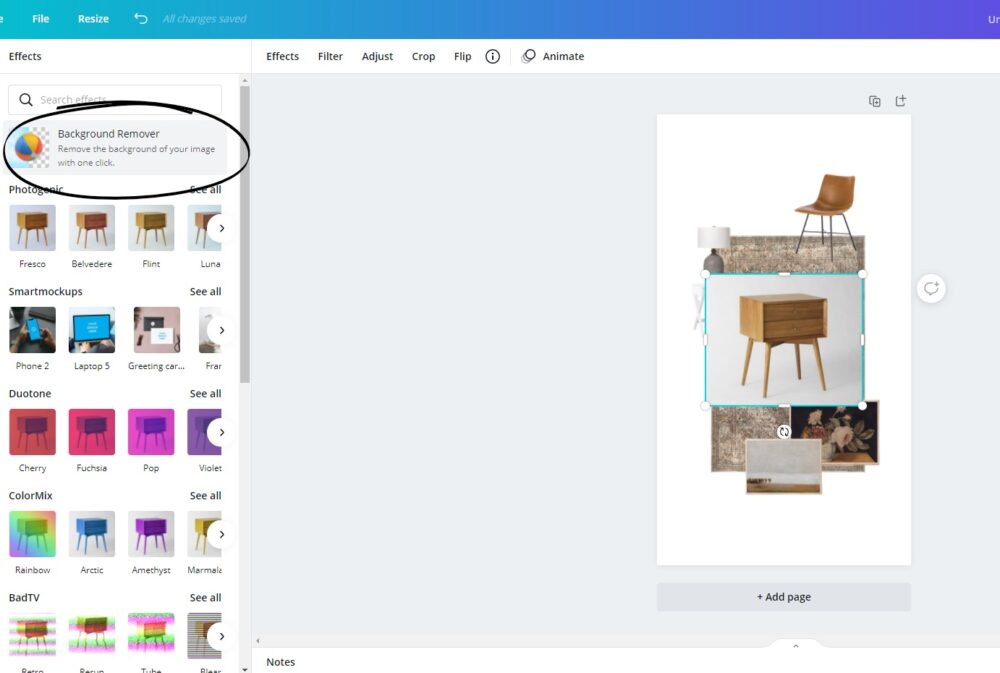
If you don’t have the Pro version, you can go to Remove.bg. You’ll have to do this BEFORE you upload them into Canva.
Flip your images
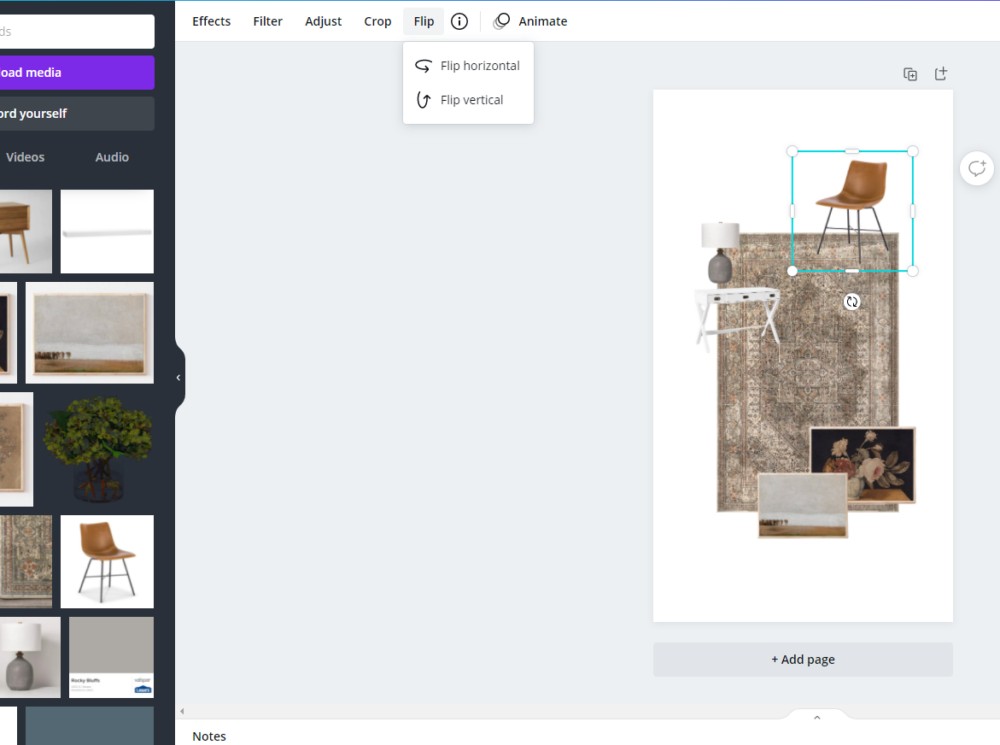
Another feature I love is the “Flip” feature on the top bar. This is especially helpful if you have a chair pointing in the wrong direction. A simple flip takes care of that issue!
Pull in coordinating colors
Canva also has this fantastic feature for pulling coordinating colors from an image. I discovered this by accident, and I’m so happy I did.
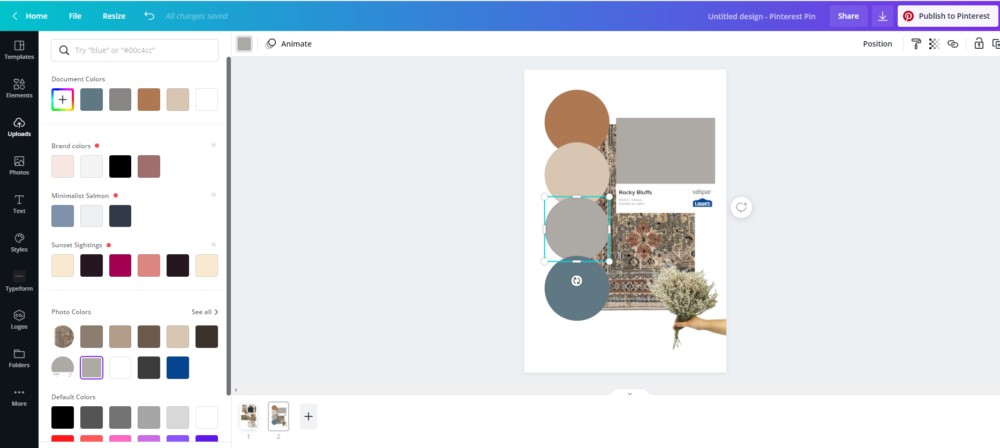
Start with an image you want to pull colors from; maybe it’s your one piece of inspiration or a rug or art.
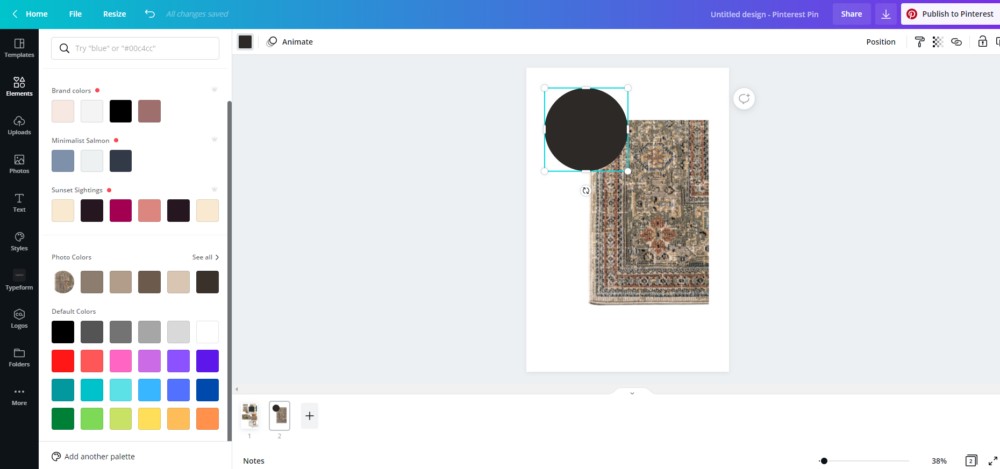
Then, click on “Elements” on the left side panel. Under the search bar on the left, scroll down until you see the “Lines and Shapes” section. Select either a gray circle or square – the shape doesn’t matter.
Once you select your shape, you will see a small square box of color in the top bar above your design. Click on this small square color box, and you will see a bunch of colors come up on the left and a section titled “Photo Colors.”
This will automatically populate all the colors from each one of the images that you have on your template! Isn’t that so cool?
You can use this to coordinate paint colors, fabrics, and window treatments. Or, you can download a paint sample from your paint store (i.e., Sherwin Williams) and use this to coordinate with the rest of the room.
How do you get a paint sample online? Simple! Just google your paint color – such as Stardew by Sherwin Williams – go to images, right-click on the color, and choose “Save Image As.” It’s as easy as that!
Position objects in your mood board
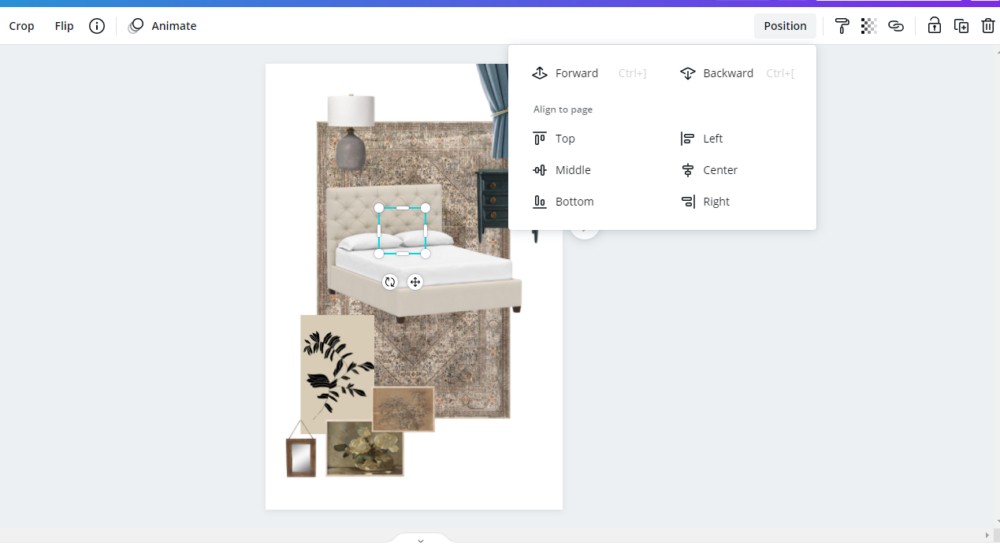
Sometimes you want to move an object in front of another, and vice versa. And you can do that in Canva as well.
On the top bar of the template, on the right side, you will see a button called “Position.” Select your image on the template, select “Position,” and move your item forward or backward as needed. Easy peasy!
Saving your Mood Board
Once you are happy with your design, please save it to your computer for printing or reference. To save it – go to the top right-hand corner of Canva; you’ll see a “Download” button. Click it, then click “Download” again. Done!
Whether designing a room or working with a designer, these mood boards will be so helpful during the design process. You can refer back to them often to stay on track and motivated.
And that about wraps up this post! I hope you found this tutorial helpful. Thanks for visiting today!
xo Karen

